Creating Azure Custom Linux VM Image
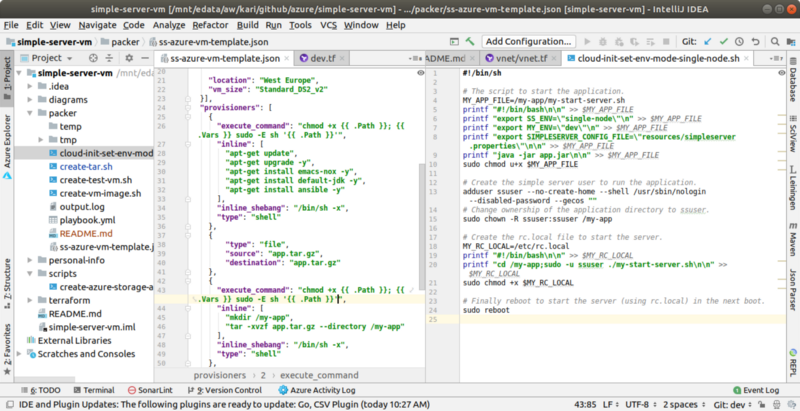
The Packer configuration file (left) and the cloud-init file (right).
Introduction
I previously did an exercise in which I deployed my Clojure Simple Server to Azure managed Kubernetes Service — AKS, you can read about that story in my previous blog posts: Creating Azure Kubernetes Service (AKS) the Right Way and Deploying Kubernetes Configuration to Azure AKS.
Now that I had some experience how to use Azure AKS as a computing platform I thought that it would be an interesting exercise to create an Azure custom Linux virtual machine image with the Simple Server baked into the image (golden image) and then create an Azure Scale set using Terraform and use that custom VM image to provision servers into the Scale set. In this blog post I describe some of the experiences creating the custom VM image and testing it. In the next blog post I’ll describe how I created the cloud infra for the Azure Scale set using Terraform and testing the application in that environment.
The project is in my Github account in the packer directory.
Packer
I’m using Packer which is quite widely used tool to create custom VM images. I have used Packer previously in the AWS side (see my previous article How to Create EC2 Images in AWS? and now it was interesting to see what it is like to use Packer also in the Azure side. Packer worked smoothly also in the Azure side — I’ll describe how I used Packer in the following chapters in more detail.
Create a Service Principal
You need a service principal that Packer is going to use. You can easily create the service principal e.g. using Azure command line interface:
az ad sp create-for-rbac --query "{ client_id: appId, client_secret: password, tenant_id: tenant }"
You get the service principal credentials. It is a good idea to create some environment file in your ~/.azure directory and export those variables there so you don’t need to write them in plain text in your scripts.
Create the Packer Configuration File
I mainly followed Microsoft’s own documentation how to use Packer — “How to use Packer to create Linux virtual machine images in Azure”. I created a Packer configuration file “ss-azure-vm-template.json” (see also the screenshot in the beginning of this article) in which I first define that my base image will be UbuntuServer 18 (which supports cloud-init that I’m going to use later). Then I install a couple of software packages that the server needs (OpenJDK) and I may need during debugging purposes (Emacs, my favorite editor).
My script creates the application distributable as a tar.gz file which I upload to the image using Packer File provisioner.
Finally the template removes the original image user.
How Packer does all this? Packer first creates a temporary Azure resource group and then creates a virtual machine in that resource group using the base image that you define in the Packer configuration file. Then Packer provisions everything according to your Packer configuration file and finally creates a new image from the snapshot of that temporary virtual server state (with all installed packages).
Ok, everything sounds easy like that but of course in real life it’s not like dancing on a bed of roses. You can read in the project’s README.md file that I spent quite a few hours to get all this stuff right. When comparing Docker container image building process to the virtual machine image building process — VM image building takes a really long time. So, do not test e.g. various provisioning in the image building process but in a running virtual server — and once you have verified that all provisioning works, only then configure them as part of the image building process.
Create Cloud-Init Configuration File
Ok. Now we have the new Azure custom Linux VM image. We have baked into the image the application untarred in a directory and also OpenJDK that the application uses as a runtime. Next we should provision the user for running the application (do not run anything as root), and some mechanism to start the application automatically on boot, and also inject in the parameters (e.g. which mode the application is running: single-node test mode or the real thing azure-table-storage mode + the storage account connection string to the Azure table storage which hosts the Tables that the application uses — in a real production system you should store all credentials to Azure Key Vault, of course).
Typically you cannot bake the parameters into the image since some of the information is known only at the time when the infra takes the VM image and starts to create the actual virtual machines in to the runtime environment (which in my case is going to be Azure Scale set). I considered various options and chose an easy way to do this: using cloud-init. Most modern Linux systems support cloud-init. Using cloud-init you can easily create various configurations to be run on the first boot. I created a very simple bash file which I inject to the infra which uses the VM image and the cloud-init script to make the first-time-boot configurations. The cloud-init script “cloud-init-set-env-mode-single-node.sh” (see also the screenshot in the beginning of this file) is pretty simple: It first creates the application start script (“my-start-server.sh”), then it creates the application user (ssuser), changes the ownership of the application directory to the application user and finally creates a rc.local file which calls the start server script on boot. Finally the cloud-init script boots the server so that rc.local will start the server on the next boot.
Once you are ready with all these configuration files you can try to build a test virtual machine using azure command line interface (in the next blog post I describe how I create an Azure Scale set infrastructure using Terraform in which I use this VM image):
az vm create --resource-group YOUR-RESOURCE-GROUP --name YOUR-VIRTUAL-MACHINE-NAME --image YOUR-VM-IMAGE-NAME --custom-data ../packer/cloud-init-set-env-mode-single-node.sh --ssh-key-value [@vm_id_rsa](http://twitter.com/vm_id_rsa "Twitter profile for @vm_id_rsa").pub --vnet-name YOUR-VNET --subnet YOUR-SUBNET --admin-username YOUR-USER-NAME --location YOUR-LOCATION
The script starts creating the virtual machine and finally tells that the VM is ready and tells some information regarding the VM like the public IP — use the public IP and the ssh key you used previously to logon to the server and check if the application is running:
ps aux | grep java
ssuser .... <some stuff> .... java -jar app.jar
ubuntu .... <some stuff> .... grep --color=auto java
sudo systemctl status rc-local
 rc-local.service - /etc/rc.local Compatibility
 Loaded: loaded (/lib/systemd/system/rc-local.service; enabled-runtime; vendor preset: enabled)
...
 Active: activating (start) since Mon 2019-01-28 19:43:28 UTC; 1min 28s ago
...
Jan 28 19:43:54 inittest5-vm rc.local[1017]: 2019-01-28 19:43:54 DE [main] DEBUG simpleserver.webs
Jan 28 19:43:54 inittest5-vm rc.local[1017]: 2019-01-28 19:43:54 DE [main] DEBUG simpleserver.webs
Jan 28 19:43:54 inittest5-vm rc.local[1017]: 2019-01-28 19:43:54 DE [main] DEBUG simpleserver.webs
Jan 28 19:43:55 inittest5-vm rc.local[1017]: Started server on port 3045
All right! The server started automatically with the new virtual machine. Now open port 3045 in the virtual server network security group for your local workstation (I already configured port 3045 to be open in the relevant subnet using Terraform, more about that in the next blog post) and test the server once again with my poor man’s Robot framework simulator:
./call-all-ip-port.sh PUBLIC-IP 3045
... a lot of stuff, and finally last API call and return value:
{"ret":"ok","pg-id":"2","p-id":"49","product":["49","2","Once Upon a Time in the West","14.4","Leone, Sergio","1968","Italy-USA","Western"]}
Conclusions
Creating a custom VM image using Packer is pretty much the same in both AWS and Azure. Comparing building Docker container image and VM image the main thing is that building a VM image takes a really long time — you have to test all your provisioning and startup scripts in a live VM before you use them in the image building script.
The writer has two AWS certifications and one Azure certification and is working at the Tieto Corporation in Application Services / Application Development / Public Cloud team designing and implementing cloud native projects. If you are interested to start a new cloud native project in Finland you can contact me by sending me email to my corporate email or contact me via LinkedIn.
Kari Marttila
Kari Marttila’s Home Page in LinkedIn: https://www.linkedin.com/in/karimarttila/