Python and Clojure side to side.
Introduction
We are building an in-house product in our unit. I was asked to create a quick proof of concept (POC) to see if it is feasible to create this kind of product. I asked if I am allowed to use what ever tools I want to build the POC as fast as possible. The product owner said yes. I chose to build a Clojure fullstack app. The application runs on AWS platform and uses several AWS services like Cognito, DynamoDB, and Bedrock. I used Cognitect aws-api to interact with those AWS services.
It was really fast to build the fullstack Clojure POC. But later on, the product owner said that we start to build the actual product, and for the product we need to use more mainstream languages. He chose Python as the language for the backend, and Typescript for the frontend. I was asked to convert the Clojure POC backend to Python. Product owner suggested that I use some generative AI tool with the conversion. I thought that this was a good idea. I would see how feasible it is to use genAI tools in that kind of conversion. This blog post describes my experiences with that conversion work.
Strategy
I had heard bad experiences regarding converting code bases from one language to another in one shot. I was experimenting converting simple Clojure functions to Python, and I realized that mostly the conversion was done pretty well, but there were small errors here are there. If there are e.g. just one error per function, that will cumulate for a big code base quite quickly. And at the end of conversion you have a new totally broken code base with the target language.
Therefore, I decided not to try to convert the whole Clojure backend code base in one shot, but to convert every Clojure function one by one, and implement unit and integration tests for each function to validate the Python function works exactly the same way as its Clojure counterpart.
While doing this kind of conversion, I realized another insight. You need to have domain knowledge and understanding regarding the source system. This was naturally easy for me, since I had written all of the Clojure POC code base. But I realized that maybe those big conversion projects had failed for two reasons. In big conversion projects you may end up with a broken code base with the target language, and possibly the conversion specialists are not those specialists who created the source system in the first place - therefore lacking true domain understanding whether the generated target system really does the same thing as the source system.
Copilot
My corporation provides a Copilot Enterprise license for me. I have been using Copilot in programming for quite a long time already. You might want to read my other Copilot related blog posts as well:
So, the first functions were a bit difficult for Copilot to convert from Clojure to Python. But then I realized that with good prompting and using the previous functions as an example (in the prompt, mentioning to use them as an example of a good conversion), Copilot became more and more fluent in the conversion work.
Example of this kind of prompting:
In #file:sessionutil.py I have functions get_role_name and get_project_name.
Now I need you to create a similar get_organization_name function in Python for this Clojure function:
(defn get-organization-name "Gets the organization name for the given org-id." [org-id] (let [params...
(… I copy-pasted the Clojure function get-organization-name at the end of the prompt). Copilot created a perfect Python function as an output.
For similar functions I used the same prompting technique for test cases as well, and if there were similar test case function to be used as an example, Copilot quite often created good test cases for the new function as well (or at least good skeletons for the human programmer to fill in the details).
Example Conversion
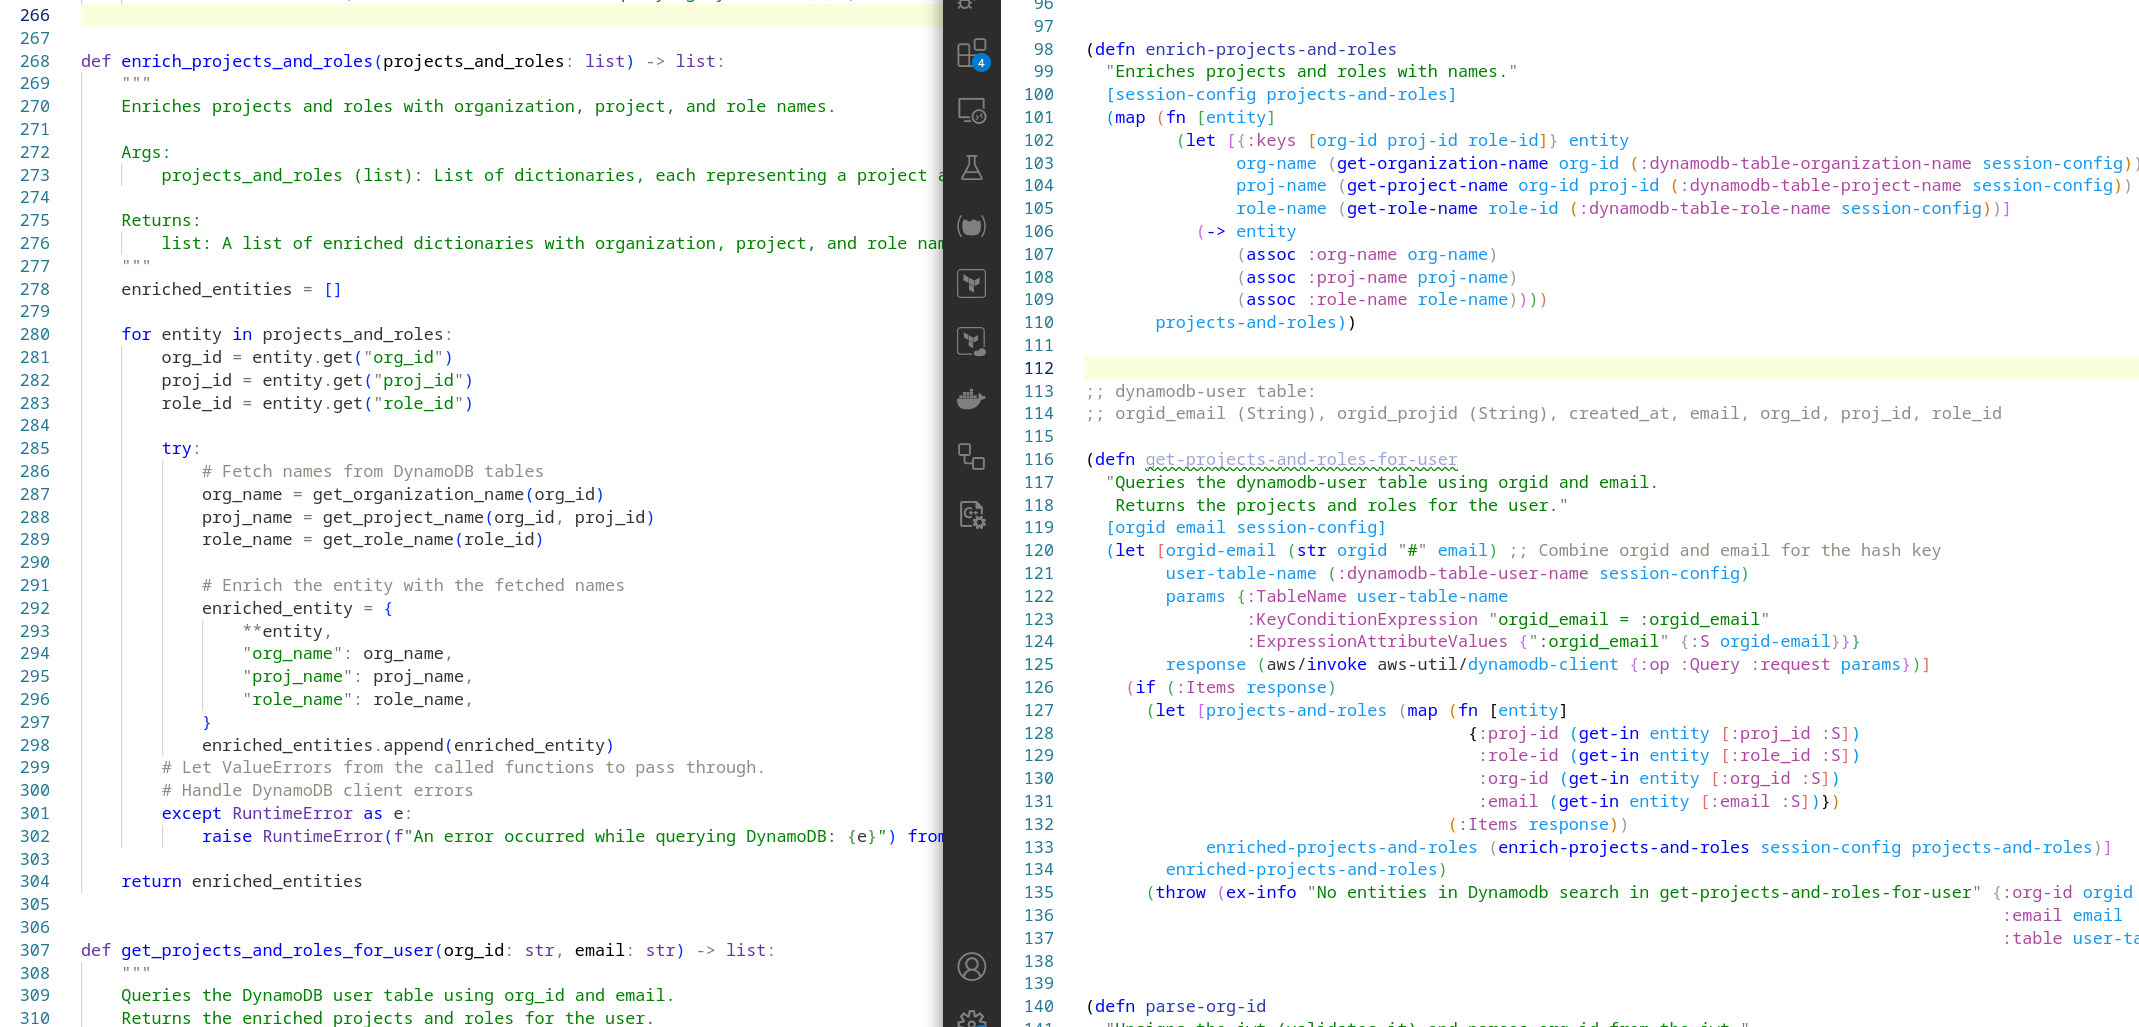
Let’s show one example conversion. This is the source Clojure function to enrich the list of domain data with entity names:
(defn* enrich-projects-and-roles
  "Enriches projects and roles with names."
  [session-config projects-and-roles]
  (map (fn [entity]
         (let [{:keys [org-id proj-id role-id]} entity
               org-name (get-organization-name org-id (:dynamodb-table-organization-name session-config))
               proj-name (get-project-name org-id proj-id (:dynamodb-table-project-name session-config))
               role-name (get-role-name role-id (:dynamodb-table-role-name session-config))]
           (-> entity
               (assoc :org-name org-name)
               (assoc :proj-name proj-name)
               (assoc :role-name role-name))))
       projects-and-roles))
… and the converted Python function:
def enrich_projects_and_roles(projects_and_roles: list) -> list:
    """
    Enriches projects and roles with organization, project, and role names.

    Args:
        projects_and_roles (list): List of dictionaries, each representing a project and role.

    Returns:
        list: A list of enriched dictionaries with organization, project, and role names.
    """
    enriched_entities = []

    for entity in projects_and_roles:
        org_id = entity.get("org_id")
        proj_id = entity.get("proj_id")
        role_id = entity.get("role_id")

        try:
            # Fetch names from DynamoDB tables
            org_name = get_organization_name(org_id)
            proj_name = get_project_name(org_id, proj_id)
            role_name = get_role_name(role_id)

            # Enrich the entity with the fetched names
            enriched_entity = {
                **entity,
                "org_name": org_name,
                "proj_name": proj_name,
                "role_name": role_name,
            }
            enriched_entities.append(enriched_entity)
        # Let ValueErrors from the called functions to pass through.
        # Handle DynamoDB client errors
        except RuntimeError as e:
            raise RuntimeError(f"An error occurred while querying DynamoDB: {e}") from e

    return enriched_entities
If you are a clojurian like me, you may have spotted defn*. That’s the snitch defmacro. I used snitch to instrument the function to check what is the value passed to parameter projects-and-roles, so that I can use that as data in the equivalent test case for the python code (I didn’t create tests for the Clojure code base since it was a quick POC). I also did some refactoring - moved fetching the DynamoDB table names from the configuration to the functions they are used.
Copilot Generation Instructions
You can create file .github/copilot-instructions.md to provide detailed instructions Copilot should use when generating new code. E.g. I found out that Copilot generated too long lines in functions. Therefore, I needed to instruct Copilot to follow the project linting rules:
In #file:sessionutil.py I need function get_project_role_info.
See other functions and #file:copilot-instructions.md how to write it.
Make it the same functionality as in this Clojure function:
(defn get-project-role-info "Queries the user Dynamo ...
And Copilot answers:
Here’s the Python implementation of the get_project_role_info function in
#file:sessionutil.py, modeled after the provided Clojure function and adhering to the style
of the existing functions and the linting instructions in #file:copilot-instructions.md:
def get_project_role_info(org_id: str, proj_id: str, email: str) -> dict: ...
(Line breaks mine.) In the Copilot prompt, you don’t have to mention adhering to the .github/copilot-instructions.md - Copilot does this automatically.
Comparing Developer Experience with Python and Clojure
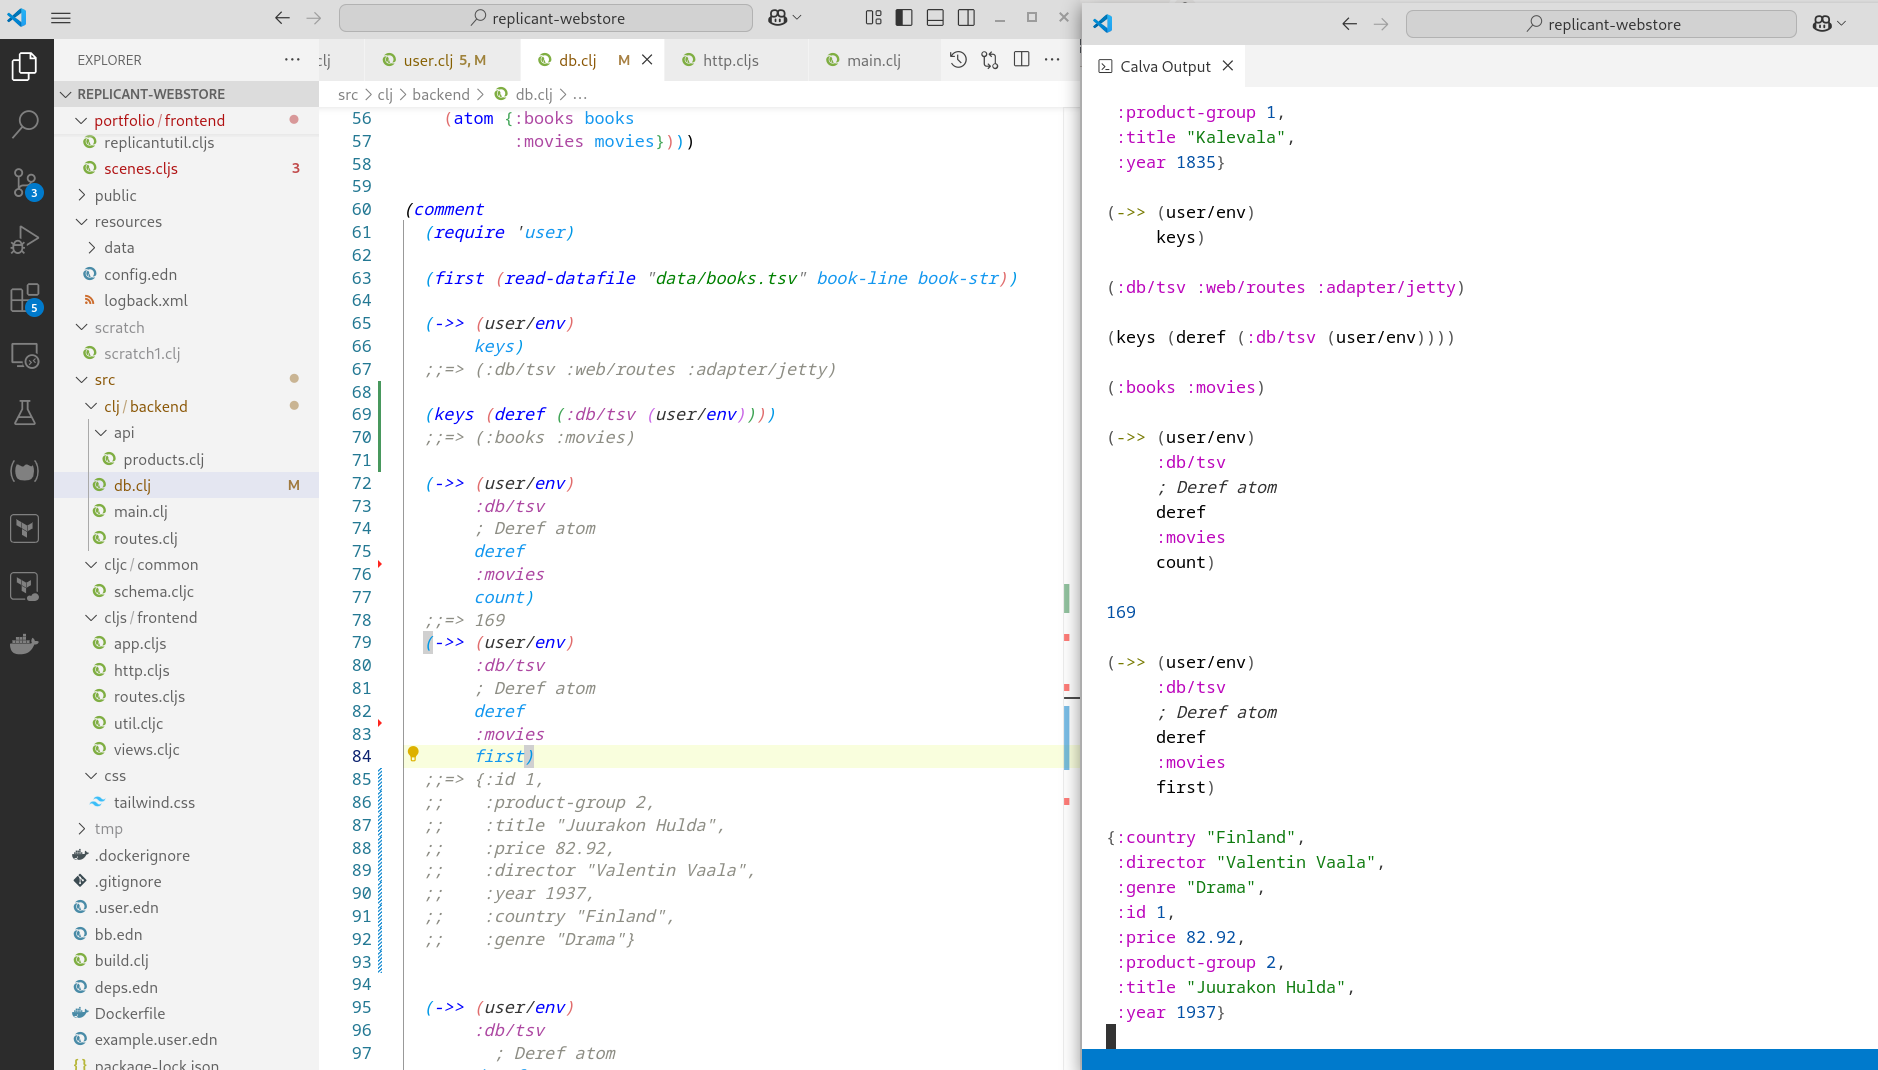
Clojure wins 6-0, no question about it. Snitch is just one example I could use in the Clojure side. Using Clojure REPL and a good Clojure REPL editor integration like with Calva you can quite quickly implement various functionalities using Clojure and test the functionality at the spot you are writing the code using the Clojure REPL editor integration. There is no such good REPL editor integration for Python, and there cannot be since Python is not a homoiconic language. I once did some research regarding Python REPL and wrote that blog post regarding my findings. For python development my usual workflow is: 1. Implement the skeleton for production function, 2. Implement unit and integration tests for the function. 3. Use the test cases as a development bench for further developing the production function. I.e., write, run the test, see what happened - rather caveman style of programming if you compare to the Lisp development practices. In the Clojure side, you can add a Clojure rich comment, e.g. snitch the function, and then examine the bindings in the function, put returned data to rich comment, tap it to portal for examination, etc. (for more about these techniques, see: Clojure Power Tools Part 3). Using Clojure you can interact with the live system with your REPL in the editor. This is really something I miss with other languages.
Another observation is the code base size. Using Clojure you end up with considerably smaller code base. Smaller code base makes it easier to grasp the domain knowledge of the code base.
If you interested comparing Clojure and Python, here are my observations as a short summary:
- REPL: Clojure has an excellent REPL editor integration. Python does have a REPL (like many interpreted languages do), but it is a poor counterpart compared to powerful REPLs in homoiconic Lisp languages.
- Immutable data structures: Clojure: yes, Python: no.
- Using functional programming paradigm: Clojure is a functional language, but you can do quite nice functional code using Python as well.
- Standard library: Clojure provides a powerful sequence abstraction in its standard library.
- Macros: You need a homoiconic language for creating a powerful macro functionality incorporated into the language. See an example of writing macros.
- Concurrent programming and threads: See Rationale which explains that Clojure is a hosted language running on JVM which supports native threads. Clojure was implemented with concurrent programming as one of the main goals. Using immutable data structures concurrent programming removes one major issue with threads manipulating the same mutable data. Clojure also provides good primitives for sharing the same data with different threads, see more about this in Concurrent Programming. Python has Global Interpreter Lock (GIL) and uses a library to provide concurrent programming.
- Structural code editing: Using paredit editing Clojure code is a breeze.
- Code base size: For Clojure, the code base tends to be considerably smaller. You can express more with less code.
- Developer pool: Python wins hands down. E.g., this was the main reason my product owner didn’t want to implement the actual product using Clojure (“How many Clojure developers there are in our corporation if you decide to leave?”) This is a major issue with Clojure. One solution would be to build a Clojure team so that there are more than one developer in the team.
Conclusions
Generative AI tools are already so good that they can be used to convert code bases from one language to another. But you need to have good domain knowledge of the source system, and it is a good strategy to do the conversion function by function, not in one shot. But as these generative AI tools are getting better and better, I expect them to be able to do the conversion in one shot as well, and create test cases and run the test cases and fix the errors done in the first round of the conversion.
The writer is working at a major international IT corporation building cloud infrastructures and implementing applications on top of those infrastructures.
Kari Marttila
Kari Marttila’s Home Page in LinkedIn: https://www.linkedin.com/in/karimarttila/
]]>


 AWS Bedrock logo.