How to Create EC2 Images in AWS?
We continue our AWS related blog series that we started in our first article Use AWS services as building blocks to implement your enterprise system. In this new article we talk about our experiences regarding how to create EC2 images.
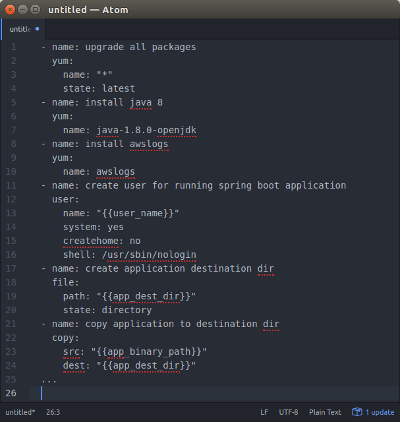
Example Packer Playbook file.
Introduction
There are several ways to create application services to AWS infrastructure:
- EC2 instances (servers).
- Docker containers.
- Lambda (serverless functionality).
We’ll write about Docker containers and Lambda later. This blog post is a short introduction how to create EC2 images to be used in the Amazon Web Services infrastructure.
What Are EC2 Instances?
EC2 instances are server images that you can host in the AWS infrastructure and integrate them seamlessly to AWS load balancers, auto scaling groups etc. You can create your own EC2 images using some pre-baked AWS image (e.g. some Linux flavor AMI (Amazon Machine Image) which is basically just a Linux with some AWS cloud tooling baked into the image).
How to Create Custom EC2 Images?
In our previous AWS project we created kind of micro services (from the deployment perspective) for each application of the system. Instead of providing one monolithic application we divided the application logic to independent applications which had dedicated deployment configurations.
You have two basic strategies when pre-configuring EC2 images — the strategies and their variations are well described in Amazon Web Services article “AWS AMI Design”. Either you create just a basic machine image, deploy it and then configure the running image at launch (flexible), or you pre-bake the AMI as much as possible before deployment (simple). We followed the simple strategy and pre-baked the AMIs as much as possible before deployments. One of our AMI images is depicted in the picture below.
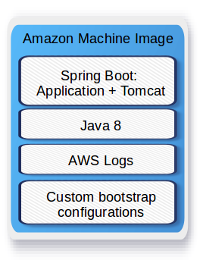
Example AMI Image for Spring Boot Application.
We used one standard Amazon Machine Image as our basic image and for each application we created Packer / Ansible script (see picture in the beginning of this article) which took the basic image and provisioned the needed software (e.g. Java8, Python3, AWS Logs Agent…) on top of the basic image and finally installed the application to the image. We used Spring Boot, so the application server (Tomcat) was nicely embedded into the application jar. After all installations the image was finally preconfigured (custom Bash scripts: logging functionality etc.) so that the image was ready for deployment to any environment. The new image was then stored as a new AMI in the customer’s AWS account’s AMI storage. Any of the new AMIs in this storage was ready for deployment to any of the customer AWS environments (functional testing environment, performance testing environment…). The deployment of the AMI to a specific environment was done using Terraform scripts (see more detailed description how to use Terraform in our previous article How to Create and Manage Resources in Amazon Web Services Infrastructure?). It was pretty simple to choose an AMI identifier you wanted to test or deploy to production, add it to environment’s Terraform script and deploy the changes to the AWS environment. You could also easily automate the deployment process in your continuous integration server.
Phoenix vs. Snowflake Servers
The servers we deployed to the AWS infrastructure were so called Phoenix Servers. We didn’t do any configurations or any other changes to the servers once they were created and deployed to some environment. If we needed to make some changes to the server or application we just abandoned the server AMI, created a new AMI and deployed it to the AWS infra.
Conclusion
There are many ways to create application services to AWS infrastructure. When you create EC2 images we recommend Pre-baked Phoenix Server / Golden Image strategy.
Both writers are AWS Certified Solutions Architects Associate, architecting and implementing AWS projects in Tieto CEM Finland. If you are interested about starting a new AWS project in Finland, you can contact us with firstname.lastname at tieto.com.
Kari Marttila & Timo Tapanainen
Kari Marttila’s Home Page in LinkedIn: https://www.linkedin.com/in/karimarttila/
Timo Tapanainen’s Home Page in LinkedIn: https://www.linkedin.com/in/timo-tapanainen/