Running Azure Kubernetes Service (AKS)

Azure + Kubernetes = Azure Kubernetes Service (AKS).
Introduction
This is the second part of the Kubernetes blog articles that I started in Exploring Kubernetes with Minikube. In this blog article I’ll continue my explorations in the Kube Land using Azure Kubernetes Service (AKS) as my playground.
What is Azure Kubernetes Service?
Azure Kubernetes Service (AKS) is a Kubernetes as a Service PaaS in which you don’t have to configure the Kubernetes Master, Nodes etc. by hand (installing various Kube agents in machines) but you get the Kube infra as a service.
Cloud Infra Process Model
When I was doing my Azure Kubernetes exercise I first used the Minikube as my Kubernetes runtime (as described in my previous blog post). Then I created the Kubernetes AKS infra manually in the Azure Portal / using the Azure CLI just to get an idea what kind of elements there are and whether I can then get the ARM template for free from the working setup (a bit the same scenario I have used in the AWS side — first create a working skeleton using the Portal, then create the automation script (using Terraform or CloudFormation) to automate the same thing, run the automation script and verify that you got the same thing as earlier doing the infra manually.
AKS Manual Installation
I mostly used this document as my guidline: “Quickstart: Deploy an Azure Kubernetes Service (AKS) cluster”. So, basically the manual steps were:
- First check in which Azure regions AKS is supported. Then create a resource group in that region.
- Create an Azure Container Registry (ACR) unless you already have created one for other Docker related purposes.
- Tag the Docker images you are planning to use in your new Kube infra with the Azure Container Registry prefix and push images to Azure Container Registry.
- Create the AKS using CLI: “az aks create –resource-group aks-demo –name kube-demo-cluster –node-count 1 –generate-ssh-keys” => takes several minutes to create, finally prints a lot of stuff and “provisioningState”: “Succeeded”.
- Configure AKS to use Azure Container Registry. This part involves several steps like: 1. Getting the AKS credentials using CLI (
az aks get-credentials --resource-group <your-resource-group-name> --name <your-kube-cluster-name>), 2. Checking the configuration using kubectl (kubectl config view=> you should see your new Kube cluster configuration here), 3. Get the service principal (az aks show --resource-group <your-resource-group-name> --name <your-kube-cluster-name> --query "servicePrincipalProfile.clientId" --output tsv"), 4. Get the ACR resource id (az acr show --name <your-docker-registry-name> --resource-group <your-resource-group-name> --query "id" --output tsv"), and finally 5. Glue AKS and ACR together (create --assignee <Service-Principal-id> --role Reader --scope <ACR-Registry-Resource-id>).
Deploy the Kubernetes Deployment Configuration
All right. You know have a Kubernetes runtime on Azure. Let’s deploy the Kubernetes deployment to test that it is working properly. The deployment goes pretty much the same way as with Minikube as I wrote in my previous article Exploring Kubernetes with Minikube. The only thing that we need in the Azure side compared to Minikube deployment is the static IP I mentioned already in my previous article (remember the “REPLACE_IP” string in the yml file?). It’s pretty easy to create a static IP using Azure CLI: az network public-ip create --resource-group <resource-group-name-of-the-cluster> --name <give-some-name-for-static-ip>--allocation-method static. There is one catch here that may cause trouble if you don’t notice it: the --resource-group parameter refers this time to the resource group name of the cluster, not the Azure resource group you created in the first step.
Now that you have the static ip you can use the Kube deployment script given in the previous blog article. Then use kubectl to verify that everything is as it should be: kubectl get deployments. Also curl your service using the static ip to see that your the service in your docker containers is serving requests as they should.
Creating AKS Infra Using ARM Template
Usually you can base your ARM template by the “Automation script” template in the Azure Portal based on some configuration you created earlier e.g. using directly Azure Portal or Azure CLI (as we did earlier). However, Azure Portal does not provide at the moment the template for AKS (there was an error message: “Kubernetes services cannot be exported yet and is not included in the template”). So much for that idea. Therefore I had to manually write the needed ARM configuration for AKS. Check later if Azure Portal has started to support AKS also in the “Automation script” section — you can then validate that the template provided by Azure Portal does not differ too much from the template you have created manually. I just used Microsoft documentation and some examples how to configure AKS using ARM. Microsoft provides excellent quick start templates for ARM configurations in Github, e.g. this template did the trick: https://github.com/Azure/azure-quickstart-templates/tree/master/101-acs-kubernetes . A screenshot how I slightly adapted the template to my needs.
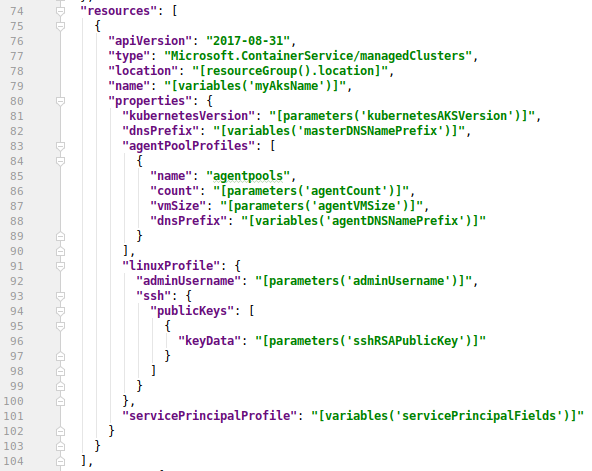
ARM json code related to AKS infra.
There is some stuff that you need for the parameters for the script. A more experienced Azure guru might put that stuff into the script (at least in the AWS side in Terraform code I used to create/query various parameter values and injected them elsewhere in the code), but since this was more or less an exercise I just used CLI to create/query those values: az ad sp create-for-rbac --name <your-service-provider-name> --role="Contributor" --scopes="/subscriptions/<subscriptionID>/resourceGroups/<your-resource-group-name>" => you get appId and password, use them as parameters for the ARM configuration.
Then use Azure CLI to deploy that ARM file:
az group deployment create --name <your-deployment-name>
--resource-group <your-resource-group-name> --template-file <your-json-file> --parameters [@](http://twitter.com/aks "Twitter profile for @aks")<your-json-parameters-file>
. Wait for the deployment. Then get the Kubernetes context as described in the manual setup. Switch kubectl to this new context. Then you need to connect this AKS cluster to the ACR as described earlier, create the static IP for this cluster as described earlier etc. All this stuff most probably could be added to the ARM configuration and maybe I add it there later when I have gathered more Azure / ARM experience — now I just did those parts using Azure CLI as described earlier. Use kubectl to check that the system pods are running etc.
Deploy the Kubernetes deployment to this new Kubernetes cluster as described earlier. Finally the last step: use kubectl to verify that everything is as it should be: kubectl get deployments, and curl your service using the static ip to see that your service in your docker containers is serving requests as they should.
You can get a browser dashboard to the Kubernetes cluster running in Azure AKS pretty easily:
az aks get-credentials --resource-group <your-resource-group-name> --name <your-kube-cluster-name>az aks browse --resource-group <your-resource-group-name> --name <your-kube-cluster-name>### Conclusions
Creating Kubernetes cluster infra using Azure CLI is pretty easy. But if you want fully to automate everything I wouldn’t recommend a lengthy bash script full of CLI commands, but an ARM configuration or Terraform. I have pretty fluent knowledge how to use Terraform in the AWS side (see e.g. my article How to Create and Manage Resources in Amazon Web Services Infrastructure?). So, one should be able to write a complete “infrastructure as code” solution using either ARM or Terraform. This kind of solution code should be able to create all needed resources in the right order and inject the already created resource names/ids to the next resources (to be created) that have dependencies for them.
When comparing Terraform and ARM there was one thing that was quite apparent. When deploying ARM template the deployment was running rather long time without you knowing what actually was happening (at least in the terminal). When running Terraform templates on AWS it was nice to see what resources were actually being created at the moment (in the terminal), and you also got immediately an error message in the console if something went wrong.
Learning infrastructure as code knowledge is not easily acquired but requires weeks of hands-on work. My current team does not use Terraform so I’m waiting a long and winding road ahead of me when learning all ARM peculiarities (not to mention learning Azure). But the reward is also going to be good: to be able to automate cloud infra in both major public cloud platforms: AWS and Azure.