Frontend Development with Clojurescript and Replicant
Web app exercise implemented using Replicant, and showing the Gadget.
Introduction
In my previous blog post Clojure Re-Frame Exercise I wrote about implementing a UI using the Reagent Clojurescript React wrapper and the re-frame framework for managing state changes in your application. In this new blog post I tell my experiences using the Replicant library.
The exercise I explain in this blog post is in my Clojure Github repo in directory replicant-webstore.
What is Replicant?
The Replicant repo says:
Replicant is a data-driven rendering library for Clojure(Script). It renders hiccup to strings or DOM nodes. Over and over. Efficiently, without a single dependency.
Replicant is a data-driven rendering library for Clojurescript (and Clojure) that transforms Hiccup syntax into DOM nodes. It focuses solely on rendering, making it a lightweight and efficient choice for building user interfaces. So, Replicant is not a React wrapper, but just a rendering library. It is very light and easy to use. You probably learn Replicant in a couple of days while creating some demo app with it, like I did.
Good pointers for learning Replicant are:
- Replicant Github repo
- Replicant User Guides
- Various Replicant Examples
- Reference API Docs, v. 2025-02.02 (I didn’t need this document while implementing my Replicant exercise)
If someone asked me to list pros and cons using Replicant, I would provide this list:
Pros:
- Very light, no dependencies.
- Extremely simple to learn and use.
- The event handling and top-down rendering model is easy to start with but also scales for bigger projects.
- Using hiccup makes UI code very lean.
- Everything is just data.
- The state paradigm is great. You register your event handler to Replicant. You update your store via your event handler. Whenever the app state changes, you ask Replicant to re-render the changed parts of your UI.
- Reagent + re-frame feels more complex and clumsy after using Replicant.
- You don’t have to worry about various React related cryptic error messages while implementing your UI (which were for me as an old backend programmer always a bit difficult).
- Replicant is just data. No local state. No network connections in components. Therefore, you are forced to design your frontend application architecture so, that it works around passing data events to your event handler, changing the application store, and then asking Replicant to re-render all the hiccup again, and trust Replicant does this efficiently.
- Since your UI = the current state of your application store, it is easy to grasp what is happening, e.g. using the
Gadgetto see the data in your application store (more about Gadget later).
Cons:
- It’s not React. So, if you need some more complex component like a filterable and sortable html table with navigation buttons (like Tanstack Table), you either need to implement it yourself, or find the solution somewhere. I do not find this as a big issue, since while I was using Reagent, I actually very seldom needed to import any off-the-shelf React components. So, if you are not using React components, why to carry the burden of React with you when implementing simple UIs?
Example Projects
I used mostly these example projects in my exercise:
- metosin-example-project. This example project shows how to use babashka as a command runner (I have previously used mostly just). I also used a lot of configurations of this example as a basis for my exercise. This example project provides also a good example on how to use reitit, middleware, malli, etc. in the backend side.
- replicant-todomvc: Interesting repo to study the event handling in replicant.
- replicant-mini-app: I took from this solution the basic setup on how to do the replicant event processing.
- replicant-networking: How to do networking with replicant.
Using Replicant
Rendering
In this exercise app I create the UI using hiccup to reflect the application state. In this app the rendering happens when something changes in application store (by the event handler). That’s basically it. See an example of the rendering in the next chapter. Other applications might do rendering otherwise - Replicant do not dictate how you do your rendering, it just provides the rendering functionality.
An example how you can render your web pages regarding the application state (views.cljc):
(defn- page-content [state]
  (let [page (:page/navigated state)]
    (case (:page page)
      :home
      (let [status (:db/product-created state)
            error (:error status)]
        (if error
          [:div
           (show-error "Failed to create product!" true :db/product-created)]
          (when status
            [:div
             (show-info "New product created!" true :db/product-created)])))
      :products
      (let [table (products-table (get-in state [:db/data (:pg page)]) (:pg page))]
        table)
      :product
      (let [id (:id page)
            product (find-item-by-id (get-in state [:db/data (:pg page)]) id)
            table (case (:pg page)
                    :books (book-details product)
                    :movies (movie-details product)
                    [:div])]
        table)
      :new
      (let [table (case (:pg page)
                    :books (new-product state :books ["Title" "Author" "Year" "Country" "Language" "Price"])
                    :movies (new-product state :movies ["Title" "Director" "Year" "Country" "Genre" "Price"])
                    [:div])]
        table)
      [:div])))
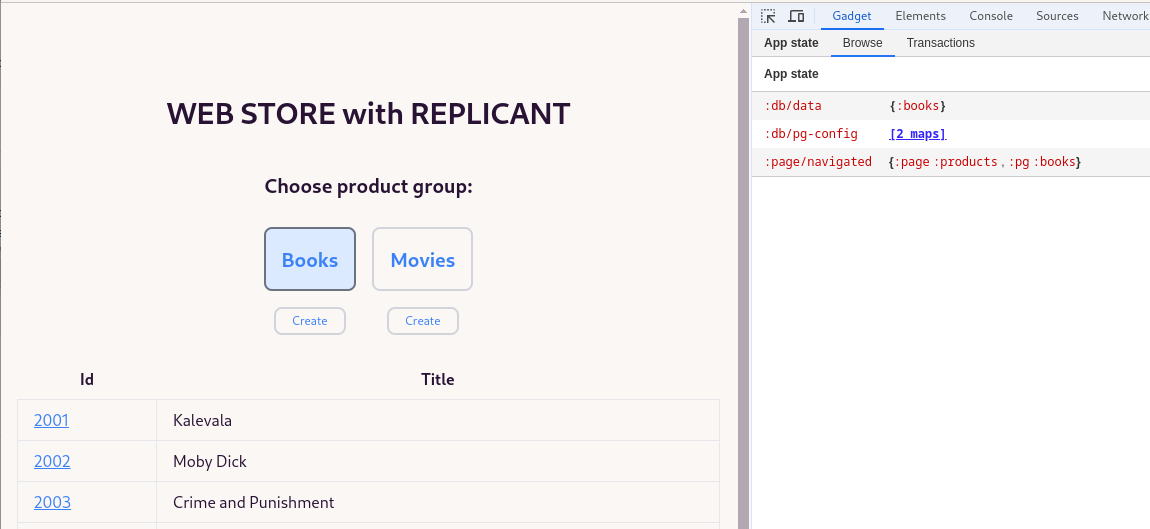
I.e., if the state says we are in the :products page, render it (and show the content in the picture at the beginning of this blog article, note also the Gadget showing that the state says that the :page/navigated is :products and specifically product groups is :books).
Replicant is just a rendering library. Read more in the Replicant documentation about the Top-down rendering model.
Application Store and State
With Replicant, you can use a data model in which your UI rendering reflects the state of your application store (see example in the previous chapter “Rendering”). When something changes in the application store, you can ask in your event handler Replicant to re-render your UI related to those parts that have changed in UI.
I guess there are several ways to setup the application store. I used the simple way used in the replicant-mini-app - the application store is just a Clojure atom app.cljs:
(defonce ^:private !state (atom ...
… and therefore the state of the application is the state of the atom in a point of time.
And at the end of the event handler, when we have processed the events, we finally render the application
(defn- event-handler [{:replicant/keys [^js js-event] :as replicant-data} actions]
  (doseq [action actions]
    ; ...
  ; ...
  (render! @!state))

(defn- render! [state]
  (r/render
   (js/document.getElementById "app")
   (view state)))   ; => Here you can build your UI view related to the state.
You can register your store to the Gadget to see a nice view of your app state in the Gadget Developer Tool:
(defn ^:export init! []
  (inspector/inspect "App state" !state)
But more about the Gadget in the Development Tooling chapter.
Event Handler
The event handler is the place where all updates happen app.cljs:
(defn- event-handler [{:replicant/keys [^js js-event] :as replicant-data} actions]
  (doseq [action actions]
    ; ...
      (case action-name
        :dom/prevent-default (.preventDefault js-event)
        :db/assoc (apply swap! !state assoc args)
        :db/assoc-in (apply swap! !state assoc-in args)
        :db/dissoc (apply swap! !state dissoc args)
        :dom/set-input-text (set! (.-value (first args)) (second args))
        :dom/focus-element (.focus (first args))
        :backend/fetch (f-http/fetch (get-dispatcher) (second enriched-action))
        :backend/post (f-http/post (get-dispatcher) (second enriched-action))
        :route/home (navigated-home-page)
        :route/products (navigated-products-page (assoc (second enriched-action) :state @!state))
        :route/product (navigated-product-page (assoc (second enriched-action) :state @!state))
        :route/new (navigated-new-product-page (assoc (second enriched-action) :state @!state))
        :action/new (action-new-product (assoc (second enriched-action) :state @!state))
        :action/validate (action-validate-new-product (assoc (second enriched-action) :state @!state))
        (when goog.DEBUG (f-util/clog "Unknown action" action)))))
  (render! @!state))
And then you just pass events (pure data) to your event handling whenever something happens that changes your UI. Example, you get new data, send the data to the event handler http.cljs:
(defn fetch [dispatcher action]
  (f-util/clog "fetch, action: " action)
  (let [pg (:pg action)
        url (str "/api" (get-in action [:query :api]))]
    (go (try
          (let [response (<! (http/get url))]
            (if (= 200 (:status response))
              (dispatcher nil [[:db/assoc-in [:db/data pg] (:body response)]])
              (dispatcher nil [[:db/assoc-in [:db/data pg] {:error (:status response)
                                                            :pg pg}]])))
          (catch js/Error e
            (dispatcher nil [[:db/assoc :db/data {:error (.-message e)
                                                  :pg pg}]
                             [:route/home]]))))))
The centralized application store and state, and centralized event handling makes the UI development simple and straightforward. You can pass your event handler (dispatcher as the parameter of the fetch function above) around your application and say your functions that if anything happens here that needs to update the UI, send an event to the event handler.
Routing
Routing can also just send data to the event handler, see routes.cljs, using Metosin reitit.frontend.easy as the routing library:
(def routes [["/" {:name :route/home}]
             ["/products/:pg" {:name :route/products
                               :path [:pg string?]}]
             ["/product/:pg/:id" {:name :route/product
                                  :path [:pg string?
                                         :id string?]}]
             ["/new/:pg" {:name :route/new
                          :path [:pg string?]}]])

(defn- get-route-actions [{:keys [data path-params] :as all}]
  (case (:name data)
    :route/home [[:route/home]]
    :route/products (let [pg (keyword (:pg path-params))]
                      [[:route/products {:pg pg}]])
    :route/product (let [id (int (:id path-params))
                         pg (keyword (:pg path-params))]
                     [[:route/product {:id id :pg pg}]])
    :route/new (let [pg (keyword (:pg path-params))]
                 [[:route/new {:pg pg}]])))

(defn start! [routes dispatch!]
  (rfe/start! (rf/router routes)
              (fn do-routing [m]
                (dispatch! nil (get-route-actions m)))
              {:use-fragment true}))
So, regarding the route we send either [[:route/home]] or [[:route/products {:pg pg}]], etc. to the event handler.
Form Handling
I took the idea of form handling from the excellent replicant-mini-app example. The idea is that in the form we store the new product (a map comprising its input fields) into the store, see: views.cljc:
(defn new-product [state pg headers]
  [:div
   [:form {:on {:submit [[:dom/prevent-default]
                         [:action/validate {:pg pg}]]}}
    [:table.table-auto.w-full
     [:tbody
      (for [header headers]
        (let [input-tag (keyword (str "input#" (cstring/lower-case header)))
              db-key-on (keyword (str (cstring/lower-case header)))]
          [:tr
           [:td.border.px-4.py-2 header]
           [:td.border.px-4.py-2 [input-tag {:on {:input [[:db/assoc-in [:db/new-product db-key-on] :event/target.value]]}}]]]))]]
    [:div.flex.justify-center.mt-4
     [:button.rounded-lg.border-2.border-gray-300.px-4.py-1.m-2.hover:bg-gray-200.cursor-pointer
      {:type :submit}
      "Submit"]]
    (let [error (:db/product-validation-error state)
          [k v] (first (:error error))]
      (when error
        (show-error (str (name k) ": " (first v)) false nil)))]])
So, [input-tag {:on {:input [[:db/assoc-in [:db/new-product db-key-on] :event/target.value]]}}] => we store into the store the field values as the user types them. And finally, when all the fields have been filled, the user submits it: [:form {:on {:submit [[:dom/prevent-default][:action/validate {:pg :books}]] => we send :action/validate event. Everything is nicely event-driven.
(defn action-validate-new-product [{:keys [pg state]}]
  (when goog.DEBUG (f-util/clog "action-validate-new-product, pg: " pg))
  (let [pg-c (f-util/get-pg-config-by-id pg (:db/pg-config state))
        pg-id (:pg-id pg-c) ; This is the number that backend uses for product group.
        product (get-product-from-store state pg-id)
        dispatcher (get-dispatcher)
        validation-ok
        (case pg
          :books (m/validate f-schema/book-without-id product)
          :movies (m/validate f-schema/movie-without-id product))]
    (if validation-ok
      (dispatcher nil [[:db/dissoc :db/product-validation-error] [:action/new {:pg pg}]])
      (let [error (case pg
                    :books (me/humanize (m/explain f-schema/book-without-id product))
                    :movies (me/humanize (m/explain f-schema/movie-without-id product)))]
        (dispatcher nil [[:db/assoc :db/product-validation-error {:error error
                                                                  :pg pg}]])))))
Here we read the new product from the store: product (:db/new-product state), start processing it (validation), and if validation is ok, we finally post it to backend (new event: :action/new).
This example also showed how simple the form validation is - just another step (event).
Testing
I do not have any tests in my application. But there is a great repo that provides a good example on how to test your pure data UI implementation: replicant-todomvc.
Peter Strömberg (the author of the Calva tool) told me that:
It is straight forward to make your application so that you have a pure function as your action handler, and have the side effects (updating the store, calling API:s and endpoints, whatever) in a separate function. It scales better, I think. And also, this way you can run your action handler from tests. (Like the todomvc example demos.) If you are familiar with re-frame, you may recognize this way of separating side effects out from pure data transformations.
Development Tools
I discovered new ways to use various Clojure and Clojurescript development tools during this exercise. I decided to write a separate blog post regarding those discoveries. But let’s introduce one development tool here that I used with Replicant: the Gadget.
You can see the Gadget in the Chrome Developer tools in the top picture of this blog post. The Gadget repo gives instructions on how to install Gadget to browser. Then telling Gadget to follow the changes of your app store is as easy as this:
(defn ^:export init! []
  (inspector/inspect "App state" !state)
Since your application store is your UI, having the app store visually next to your app UI in your browser is a great way to boost your productivity and see what happens during event handling (when application store changes, and the changes should trigger changes in your UI).
How Mature is Replicant?
I asked in the Clojurians slack / #replicant channel, Christian Johansen, the author of Replicant, how mature Replicant is, and is it safe to use Replicant in production. This is his answer:
You asked earlier how mature Replicant is - and I forgot to answer. I wrote the bulk of it the fall of 2023, and have been using it in production for a year. Over the past year I have only made minor changes to it, stabilizing, fixing some issues etc. I now consider it pretty much done. So in terms of functionality and stability I’d say it is very mature and safe to use. In terms of community (you asked for examples, etc) it was not publicly announced until January this year. So it’s still young in that sense. I’m hoping more people pick it up, and that those of you who do - and like it - help spread the word.
Start Learning and Getting Help
I encourage you to start learning Replicant. Read briefly the documentation to get some mental model how things work. Or you already know the main players of the Replicant game after reading this blog post: the app store/state and the event handler. Then study some simple Replicant example, e.g. the replicant-mini-app. Then start implementing your own app using Replicant.
If you encounter any issues how to do something in a Replicant way, consult other developers and the Replicant author Christian Johansen in the Clojurisans Slack, in its #replicant channel. Christian is active in the Clojurians slack and willing to help Replicant learners. Other clojurians like Peter Strömberg (the author of the great Calva tool, and enthusiastic Replicant user) also often provide help there.
Conclusions
Replicant was really a joy to use since it’s so lightweight and easy to learn. It made state management and rendering straightforward without the complexity of other frameworks. Sure, it doesn’t have all the fancy pre-built components (like in the React ecosystem), but for my UI needs, it was perfect. If you’re looking for a simple and efficient way to build UIs in Clojurescript, give Replicant a try!
The writer is working at a major international IT corporation building cloud infrastructures and implementing applications on top of those infrastructures.
Kari Marttila
Kari Marttila’s Home Page in LinkedIn: https://www.linkedin.com/in/karimarttila/